How to Fix a Running Toilet in Las Vegas (Easy DIY Fixes from Local Plumbers)
")
A silently running toilet might seem like a minor annoyance, but it’s a significant drain on your resources. This constant trickle of water not only wastes a precious natural resource but also silently inflates your utility bills. In Las Vegas, where water conservation is a daily priority due to drought conditions and Southern Nevada Water Authority regulations, even small leaks can have a much bigger impact over time.
Fortunately, most toilet leaks are not complex plumbing issues that require a plumber. Instead, they are often simple fixes that homeowners can tackle with basic tools and a little guidance. At Total Drain Solutions – Las Vegas, our residential plumbing team sees this issue in homes across Summerlin, Henderson, Spring Valley, and North Las Vegas every week — and the good news is that many of these problems can be solved before they turn into expensive plumbing repairs.
This article will empower you to identify and resolve common issues that cause your toilet to run, saving you money and contributing to water conservation. Household leaks can waste up to 180 gallons per week, or 9,400 gallons annually, and a running toilet is a prime offender. By understanding the simple mechanics of your toilet tank and a few key components, you can effectively stop the waste and enjoy a quieter, more efficient bathroom.
The Real Cost of a Running Toilet: Unnecessary Water Waste and Higher Bills
The sound of a continuously running toilet is more than just irritating; it’s a siren call for excessive water usage. Toilets are the main source of water use in the home, accounting for nearly 30 percent of an average home’s indoor water consumption (US EPA, 2025). A toilet that constantly trickles can waste anywhere from a few gallons to thousands of gallons per month — something our Las Vegas residential plumbers frequently uncover during routine service calls.
In Southern Nevada, where tiered water pricing is common, that wasted water adds up even faster. This unchecked flow directly translates into higher water bills. The average range for toilet repair costs is $150 to $391, depending on the problem (HomeAdvisor, 2025), a fraction of the ongoing cost of wasted water. A running toilet typically costs between $100–$400 to fix, and these water-wasters can significantly increase utility bills (HomeAdvisor, 2025). Ignoring this issue means you’re effectively paying for water that is simply disappearing down the drain.
Beyond the financial impact, this constant water waste contributes to the strain on municipal water treatment systems. Approximately 17,500 publicly owned treatment works operate in the United States, providing wastewater treatment services for approximately 270 million people (Congress.gov, 2025), and conserving water reduces the burden on these essential services — especially important in arid regions like Las Vegas.
What You’ll Learn Today: Empowering You with Easy, Practical DIY Fixes
Understanding the key components inside your toilet tank is the first step to diagnosing and fixing a running toilet.
This guide is designed to demystify toilet plumbing and equip you with the confidence to perform common repairs. We’ll break down the essential components of your toilet tank, helping you understand how your flush mechanism works. You’ll learn practical diagnostic techniques to pinpoint the exact cause of the running water, from simple listening tests to the effective dye test. Most importantly, we will provide clear, step-by-step instructions for fixing the two most common culprits: the flapper and the fill valve.
We’ll also cover how to fine-tune the float to ensure the correct water level — a crucial step in preventing overfilling. And if you ever find the problem is more than a DIY fix, the Total Drain Solutions Las Vegas residential plumbing team is always available to diagnose and repair the issue quickly and affordably.
Why Act Now: The Immediate Benefits of Water Conservation
Addressing a running toilet promptly offers immediate and tangible benefits. The most obvious is the swift reduction in your water bill. Once fixed, you’ll notice a decrease in your monthly expenditure — something Las Vegas homeowners especially appreciate with rising utility costs.
Furthermore, by fixing a running toilet, you actively participate in water conservation. Household leaks waste approximately one trillion gallons of water annually throughout the U.S. (WCSA, 2024), and stopping a running toilet is a direct way to reduce unnecessary demand on Southern Nevada’s limited water supply.
Replacing old, inefficient toilets with WaterSense-labeled models can save the average family 13,000 gallons of water and $130 in water costs per year (US EPA, 2025). If you’re concerned about water efficiency throughout your home, Total Drain Solutions also provides full residential plumbing evaluations in Las Vegas to identify hidden leaks and inefficient fixtures.
Understanding Your Toilet: A Quick Anatomy Lesson for DIY Success
Before you can effectively fix a running toilet, it’s helpful to understand the basic anatomy of its internal workings, particularly within the toilet tank. This knowledge will make the diagnostic and repair steps much clearer.
The Toilet Tank: The Heart of Your Flushing Mechanism
The toilet tank is the reservoir that holds the water needed for each flush. It’s connected to the toilet bowl via the flush valve at the bottom. When you lift the handle, a mechanism opens the flush valve, allowing the stored water to rush into the bowl and initiate the flush. After the flush, the water supply is cut off, and the tank refills to its designated level.
Key Components and Their Roles in the Flushing Process
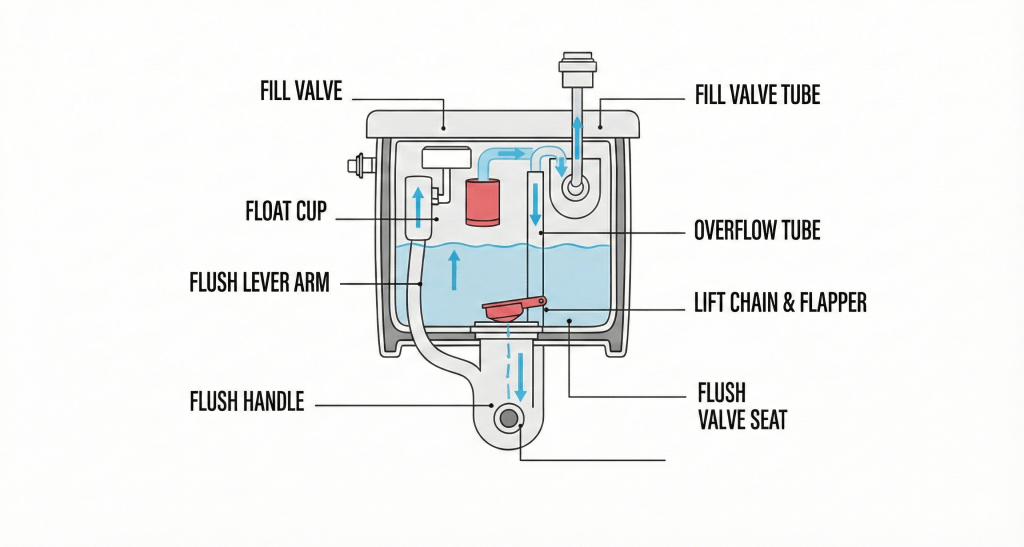
Several components work in concert within the toilet tank to ensure a proper flush and prevent continuous water flow:
- Flush Valve and Flapper: The flush valve is a large opening at the bottom of the tank. The flapper is a rubber or plastic seal that sits atop the flush valve, preventing water from entering the bowl when the toilet is not in use. When the handle is activated, it lifts the chain connected to the flapper, opening the flush valve and allowing water to escape.
- Fill Valve: This is the component responsible for refilling the toilet tank with water after each flush. It also controls the water supply and shuts it off when the tank reaches the correct water level.
- Float: Attached to the fill valve, the float (often a ball on a rod or a cup around the fill valve column) rises with the water level in the tank. When it reaches a predetermined height, it triggers the fill valve to close, stopping the water flow.
- Overflow Tube: A vertical pipe situated inside the tank. If the fill valve malfunctions and the water level rises too high, excess water flows into the overflow tube and down into the toilet bowl, preventing the tank from overflowing onto the floor. The water level should always be below the top of this tube.
- Handle and Chain: The handle on the outside of the tank is connected via a chain to the flapper. Pushing the handle lifts the chain, which in turn lifts the flapper to initiate the flush.
Diagnosing the Running Toilet: Listen, Look, and Locate the Problem
Before diving into repairs, it’s crucial to accurately diagnose the source of the running water. This diagnostic phase will save you time and effort by focusing your repair efforts on the actual problem.
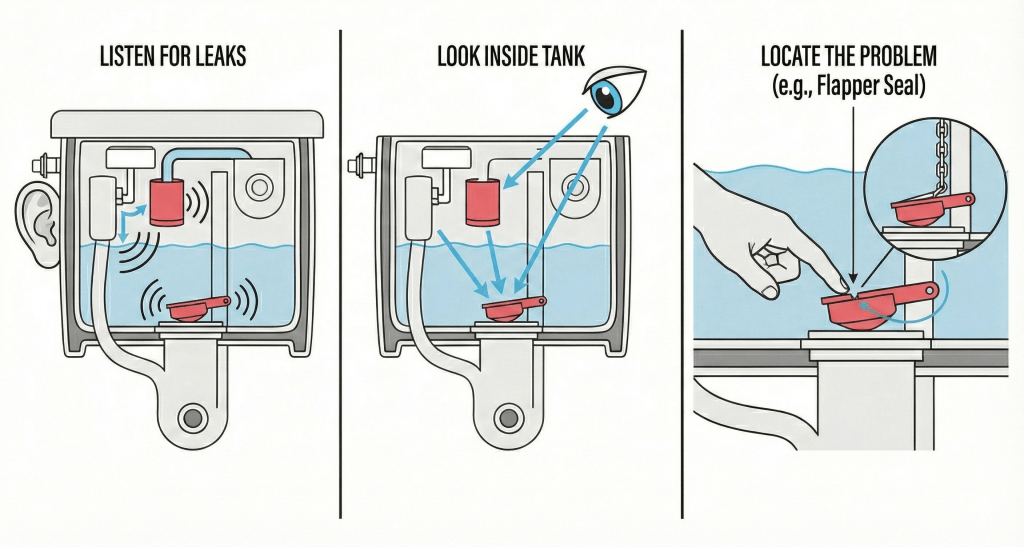
Is it a Constant Hiss, a Gurgle, or an Intermittent Refill? (toilet troubles)
Pay close attention to the sounds your toilet makes. A constant hissing sound, even after the flush has completed, usually indicates water entering the toilet tank from a faulty fill valve. If you hear the toilet intermittently refilling itself, even when it hasn’t been flushed, this also points towards a fill valve issue or a leak from the flush valve and flapper. A gurgling sound might suggest issues further down the drainpipe, but for a running toilet tank, focus on the hissing or continuous filling sounds. These toilet troubles are typically related to the components within the tank.
The Dye Test: Confirming a Leak into the Toilet Bowl
A simple dye test can confirm if water is leaking from the toilet tank into the bowl. Carefully place a few drops of food coloring or a dye tablet into the toilet tank. Do not flush the toilet. Wait for 15-20 minutes. If colored water appears in the toilet bowl, it means the flapper is not sealing properly against the flush valve, allowing water to seep from the tank into the bowl.
Observing the Water Level: Is it Too High, Too Low, or Just Right? (water flow control)
Open the toilet tank lid and observe the water level. If the water level is consistently rising above the overflow tube, the fill valve is not shutting off correctly, indicating a problem with the fill valve or its float mechanism. This excess water will constantly drain into the bowl via the overflow tube. Conversely, if the water level is too low, it might not provide enough water for a complete flush, although this usually doesn’t cause a running toilet, it’s related to water flow control.
Initial Inspection: What to Check First for Obvious Issues
With the tank lid off, visually inspect the components. Look for obvious signs of wear or damage. Is the flapper cracked, warped, or covered in mineral deposits? Is the chain to the flapper excessively long or tangled? Is the fill valve assembly visibly damaged or corroded? Check the connection of the supply line to the fill valve for any leaks. These initial visual checks can often reveal the source of the problem quickly.
Fix #1: Taming the Troublesome Flapper – The Most Common Culprit
The flapper is the most frequent cause of a running toilet. Its job is to create a watertight seal over the flush valve. When this seal fails, water constantly leaks into the bowl.
Step 1: Shut Off the Water Supply and Empty the Toilet Tank
Locate the water supply valve, typically found on the wall behind the toilet. Turn the handle clockwise until it stops. Once the water supply is off, flush the toilet to empty most of the water from the toilet tank. You can use a sponge or towel to soak up any remaining water at the bottom of the tank.
Step 2: Inspect the Flapper for Wear and Tear
Examine the flapper closely. Check for any cracks, tears, or stiffness in the rubber or plastic. Mineral buildup can also prevent a proper seal. If the flapper feels stiff or appears degraded, it likely needs replacement. Also, ensure the flapper is sitting flush against the flush valve opening.
Step 3: Adjusting the Flapper Chain for Proper Slack
The chain connecting the handle to the flapper needs the correct amount of slack. If the chain is too tight, it will hold the flapper slightly ajar, allowing water to leak. If it’s too loose, it might not lift the flapper sufficiently for a good flush. There should be about 1/2 inch of slack in the chain when the flapper is seated. Most flappers have a clip or hook system that allows for easy adjustment.
Step 4: Replacing a Worn-Out Flapper
If inspection reveals a damaged flapper, replacement is straightforward. Purchase a universal flapper designed for most toilets. Remove the old flapper by detaching it from the ears on the overflow tube and unhooking the chain. Attach the new flapper in the same manner and connect its chain to the flush lever, ensuring the correct slack.
Step 5: Restore Water and Test the Flush
Turn the water supply valve back on by turning it counter-clockwise. Allow the toilet tank to fill completely. Listen for any hissing sounds and observe if the water level remains stable. Then, flush the toilet. Check if the flapper seals properly after the flush and if the running water has stopped.
Hard water in Las Vegas often accelerates flapper deterioration due to mineral buildup. If you find that replacing the flapper doesn’t stop the leak, there may be scaling or valve-seat wear that requires professional service from a Total Drain Solutions Las Vegas residential plumber.
Fix #2: Resolving Fill Valve Malfunctions – When the Tank Won’t Stop Filling
If your toilet constantly runs and the flapper appears to be sealing correctly, the issue likely lies with the fill valve. This component regulates the water supply and refills the tank.
Step 1: Shut Off the Water and Drain the Tank (again!)
As with the flapper repair, begin by turning off the water supply at the valve behind the toilet and flushing to drain the toilet tank. Soak up any residual water.
Step 2: Identifying Your Fill Valve Type (float cup vs. traditional float arm)
There are two main types of fill valves: the older ballcock style with a float arm and a ball, and the more modern float cup style where the float is integrated into a sleeve that moves up and down the fill valve shaft. Understanding which type you have will guide the adjustment or replacement process.
Step 3: Cleaning Mineral Buildup from the Fill Valve (malfunctioning fill valve)
Mineral deposits can interfere with the fill valve‘s operation, causing it to malfunction. Carefully disassemble any removable parts of the fill valve according to the manufacturer’s instructions. Clean the components with a soft brush and a mild vinegar solution to remove mineral buildup. Rinse thoroughly before reassembly.
Step 4: Adjusting the Fill Valve’s Water Level
If the water level is too high and overflowing into the overflow tube, you can adjust the fill valve. For float cup valves, there is usually a screw or clip mechanism to lower the float cup, thereby lowering the water level. For float arm valves, you can gently bend the float arm downwards to achieve the same result. The goal is to set the water level about 1/2 inch below the top of the overflow tube.
Step 5: Replacing a Faulty Fill Valve Assembly
If cleaning and adjustment don’t resolve the issue, the fill valve assembly may need replacement. Turn off the water supply, disconnect the supply line, and remove the old fill valve according to the manufacturer’s instructions (usually involves unscrewing a locknut inside the tank). Install the new fill valve, reconnect the supply line, and ensure it’s securely tightened.
Step 6: Restore Water and Test for Proper Shut-off
Turn the water supply back on. Let the tank fill. Watch the water level carefully and listen for the fill valve to shut off completely when it reaches the desired level, ensuring it’s below the overflow tube. Flush the toilet and confirm that the running water has stopped.
Las Vegas water is known for its mineral content, which means fill valves clog and fail more often than in many other parts of the country. If mineral buildup keeps returning even after cleaning, replacing the valve is usually the most reliable solution.
Fix #3: Fine-Tuning the Float – Setting the Perfect Water Level
The float is intrinsically linked to the fill valve and plays a critical role in regulating the water level within the toilet tank. Proper float adjustment is essential for preventing continuous water flow and ensuring efficient flushing.
Understanding How the Float Controls Your Toilet’s Water Level
The float is designed to rise with the water level in the toilet tank. As the water level rises, the float lifts. When the float reaches a specific height, it activates a mechanism within the fill valve that signals the valve to close, thereby stopping the flow of water from the water supply line. If the float is set too high, it can cause the water level to exceed the capacity of the overflow tube, leading to a constantly running toilet.
How to Adjust Different Float Mechanisms (float rod, float arm, float cup)
- Float Cup: Many modern toilets use a float cup that slides up and down the fill valve body. To adjust the water level, you typically press a clip or turn a screw on the side of the fill valve and slide the float cup to a lower position.
- Float Arm: Older toilets often have a float arm with a spherical float attached. To adjust the water level, you can gently bend the float arm downwards. Be cautious not to over-bend it. Some float arm mechanisms also have a screw adjustment.
- Float Rod: Similar to the float arm, a float rod mechanism allows adjustment by bending the rod or using a screw at the connection point to the fill valve.
The Importance of Stopping Water Flow Below the Overflow Pipe
The overflow tube is a safety feature designed to prevent your toilet tank from overflowing onto the floor. However, if the water level is consistently at or above the top of the overflow tube, water will continuously drain into the bowl, creating a running toilet. The ideal water level should always be at least 1/2 inch below the top rim of the overflow tube to ensure it functions as intended and to stop the continuous water flow.
Beyond the Basics: Other Potential Issues
While the flapper and fill valve are the most common causes, other components can also lead to a running toilet.
- Tank-to-Bowl Gasket: This large rubber gasket seals the connection between the toilet tank and the bowl. If it deteriorates, water can leak from the tank into the bowl. This is less common but can cause a persistent running sound. Signs include slow leaks or visible corrosion around the tank bolts.
- Flush Valve Seat: The flush valve seat is the surface on the flush valve that the flapper seals against. If this seat is corroded or damaged, the flapper will not be able to create a proper seal. While replacement of the entire flush valve assembly might be needed, sometimes a specialized cleaning tool can address minor imperfections.
- Supply Line Issues: While less likely to cause a running toilet, a faulty water supply line connection or a worn-out washer can cause leaks at the point where the water supply connects to the fill valve.
Tank-to-bowl gasket failures, corroded flush-valve seats, and supply-line leaks are problems our Las Vegas plumbing technicians routinely find during residential plumbing inspections and leak-detection calls.
When to Call a Plumber
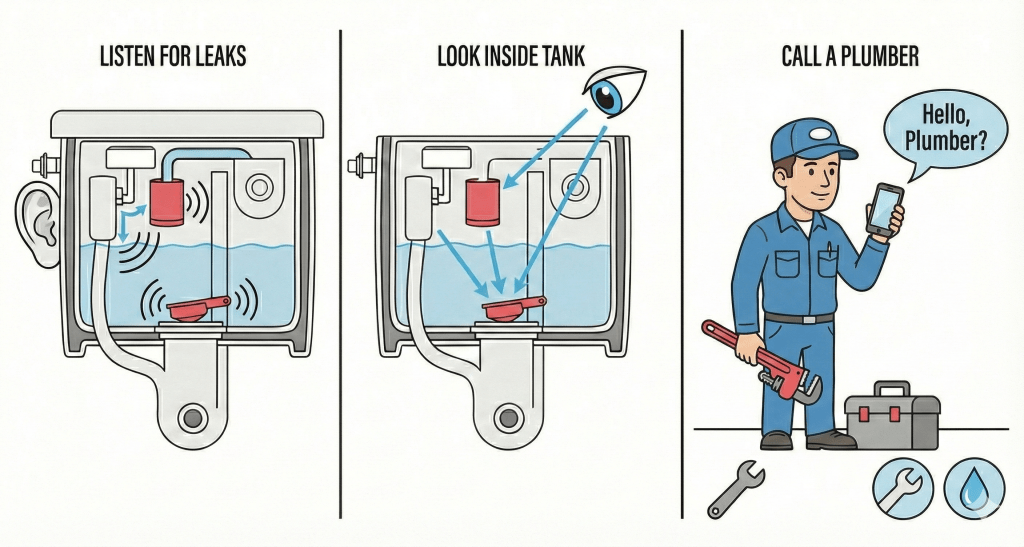
While many toilet repairs are straightforward DIY tasks, there are instances when it’s best to call a professional plumber. If you’ve tried the steps outlined above and the toilet continues to run, or if you encounter a cracked tank, damaged bowl, or leaking valve seat, it’s time to seek expert help.
This is exactly the type of work handled daily by Total Drain Solutions – Las Vegas, whether it’s a simple valve replacement or a deeper drain or water-supply issue affecting your bathroom.
Maintaining Your Toilet: Preventing Future Problems
Regular maintenance can prevent common toilet issues and ensure your fixtures operate efficiently. Periodically check the flapper for wear, adjust the chain slack, and clean the fill valve for mineral buildup. Ensure the water level is consistently set correctly. Keeping an eye on your water bill can also alert you to potential leaks early on. By performing these simple checks, you can proactively address minor problems before they escalate into costly repairs and significant water waste.
Many Las Vegas homeowners also schedule periodic plumbing checkups to catch hard-water damage early — especially in homes with older pipes or desert-climate scaling.
Closing Thoughts
Fixing a running toilet is a rewarding DIY project that offers immediate financial and environmental benefits. By understanding the basic components of your toilet tank, performing simple diagnostic tests, and following the step-by-step repair guides for the flapper and fill valve, you can successfully stop the silent drain on your resources.
In a water-conscious city like Las Vegas, every gallon saved matters. And when a quick fix turns into something more complex, Total Drain Solutions Las Vegas is here to help with fast, professional residential plumbing and drain services that keep your home efficient, compliant, and leak-free.
Learn more about our drain cleaning services in Las Vegas.
Get in touch with us today!
Tags:
Schedule Service
Our Services

Benefit From Our Complete Range of Services Today
At Total Drain Solutions, we get the work done right the first time. Each member of our team works with the highest level of integrity. By using the best technology and processes along with proven craftsmanship, we fully restore your piping system to its original condition. For more information or to get an estimate, contact our team today.